


0
items
$0
Erector Spinae Plane Block (ESPB)
a powerful single-injection trunk block that provides extensive hemithorax and hemiabdominal analgesia
- A truncal inter-fascial plane block with improved safety versus traditional epidural, paravertebral and intercostal blocks; and improved posterior anesthesia versus serratus anterior block.
QUICK SUMMARY:
This block uses a single injection in the erector spinae plane (ESP) to anesthetize multiple vertebral levels of spinal nerves where they branch into dorsal and ventral rami.
An ultrasound probe is placed on the back in cephalocaudal orientation approximately 3cm from midline at the desired vertebral level and the thoracic vertebral transverse process (TP) is identified on ultrasound.
A block needle directed via in-plane ultrasound guidance to the posterior surface of the TP.
This places the needle tip in the cephalocaudal-oriented ESP which lies between the erector spinae muscles (superficial) and the TPs (deep).
After test aspirations and test injections, approximately 30 mL of LA is slowly injected in the ESP, distending the ESP and lifting the erector spinae muscles off the transverse processes as in the clip below.
The ESP acts as a “leaky gutter” when injected with LA.
LA initially flows cephalocaudal in the ESP “gutter” posterior to the TPs spreading LA to multiple vertebral levels from the injection point and anesthetizing the dorsal rami. (Fig 1A)
LA then “leaks” anteriorly, anesthetizing the intercostal nerves at their ventral rami origin. (Fig 1B)
Figure 1A
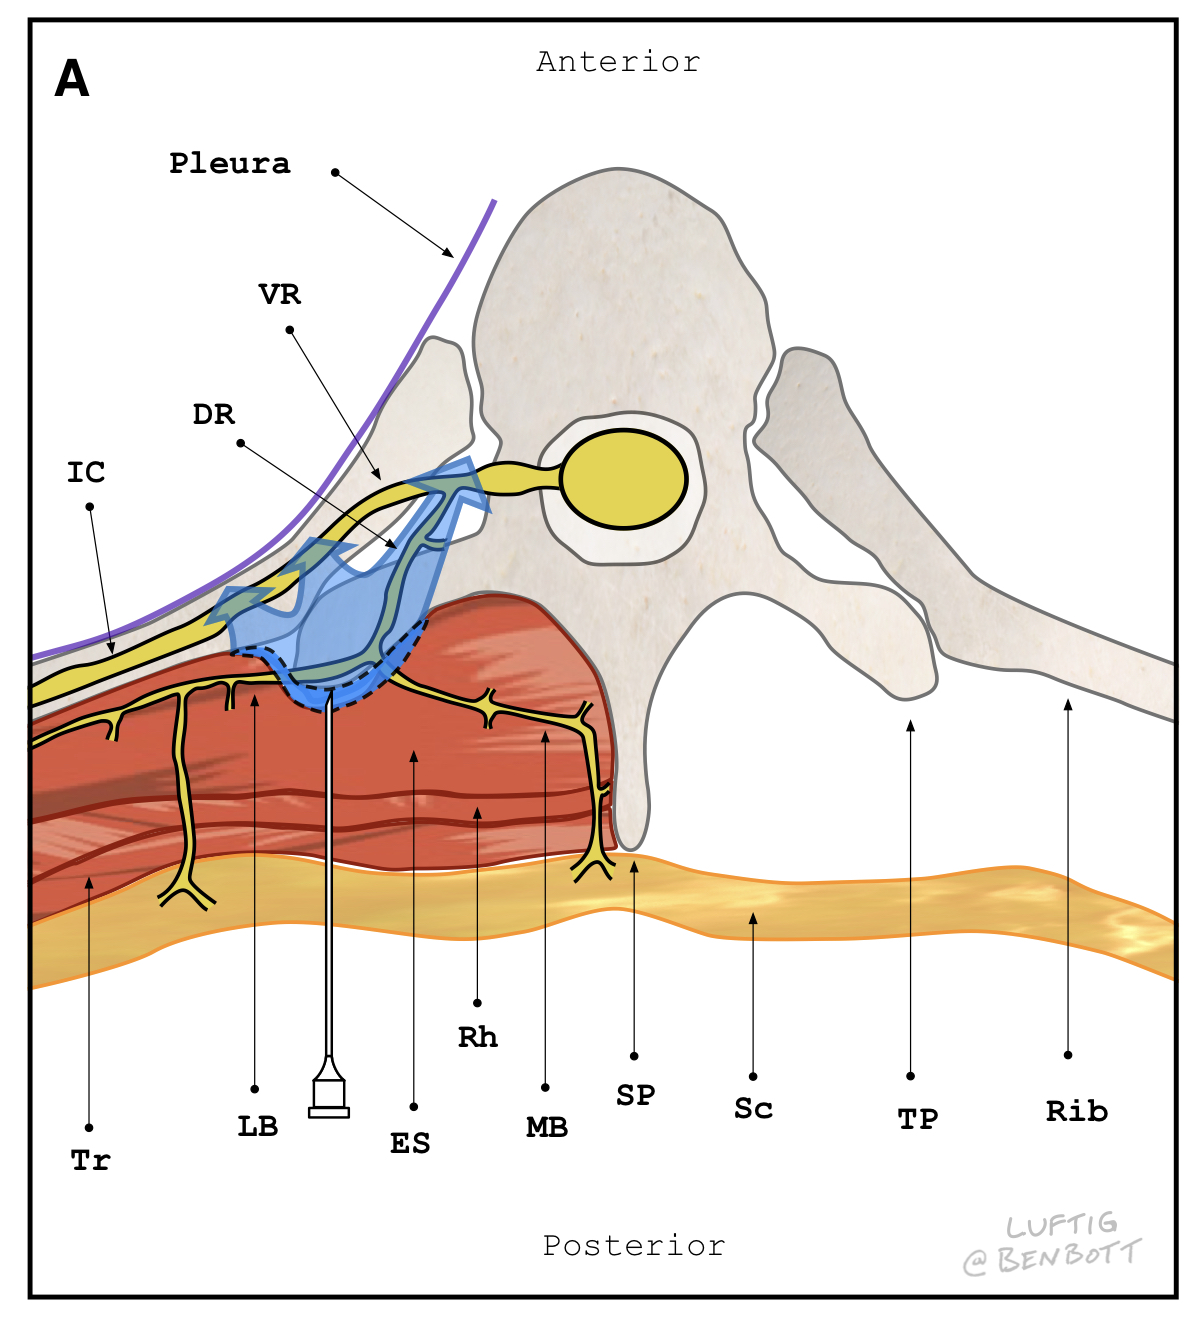
View of the posterior thorax with tissues posterior to the TPs dissected away. The block needle is shown with the tip adjacent to the 5th thoracic TP. Cephalocaudal spread in the channel-like ESP extends anesthesia at least 3 vertebral levels above and 4 vertebral levels below the injection point allowing for extensive thoracic anesthesia from a single injection. T2, T5 and T9 = left transverse processes of the 2nd, 5th, and 9th thoracic vertebrae, respectively. Dark blue = T2 through T9 level cephalocaudal spread of LA with injection at T5 level TP.
Figure 1B Local anesthetic spread with ESPB.
Cross section of posterior thorax at the level of the 5th thoracic vertebrae. The block needle is shown injecting local anesthetic (LA) into the erector spinae fascial plane (ESP), which lies in the chest wall between the anterior surface of the cephalocaudal-oriented erector spinae muscles and the posterior surface of the spinal transverse processes. LA spread in the ESP anesthetizes the dorsal rami as they traverse this plane, providing anesthesia to the adjacent injured muscle and soft tissues that contribute to posterior rib fracture pain. Additionally, LA injected into the ESP spreads anterior, anesthetizing the ventral rami where they become intercostal nerves. This intercostal nerve anesthesia provides analgesia directly to the fractured ribs and periosteum, and to the lateral and anterior chest wall via the lateral and anterior branches of the intercostal nerves. DR = dorsal ramus, VR = ventral ramus, IC = intercostal nerve, dark blue shaded area = LA within the ESP, light blue shaded area = anterior LA spread to the IC and VR, LB = lateral branch of the DR, MB = medial branch of the DR, TP = transverse process, SP = spinous process, Tr = trapezius muscle, ES = erector spinae muscle, Rh = rhomboid muscle, Sc = subcutaneous tissue.
What we love about the Erector:
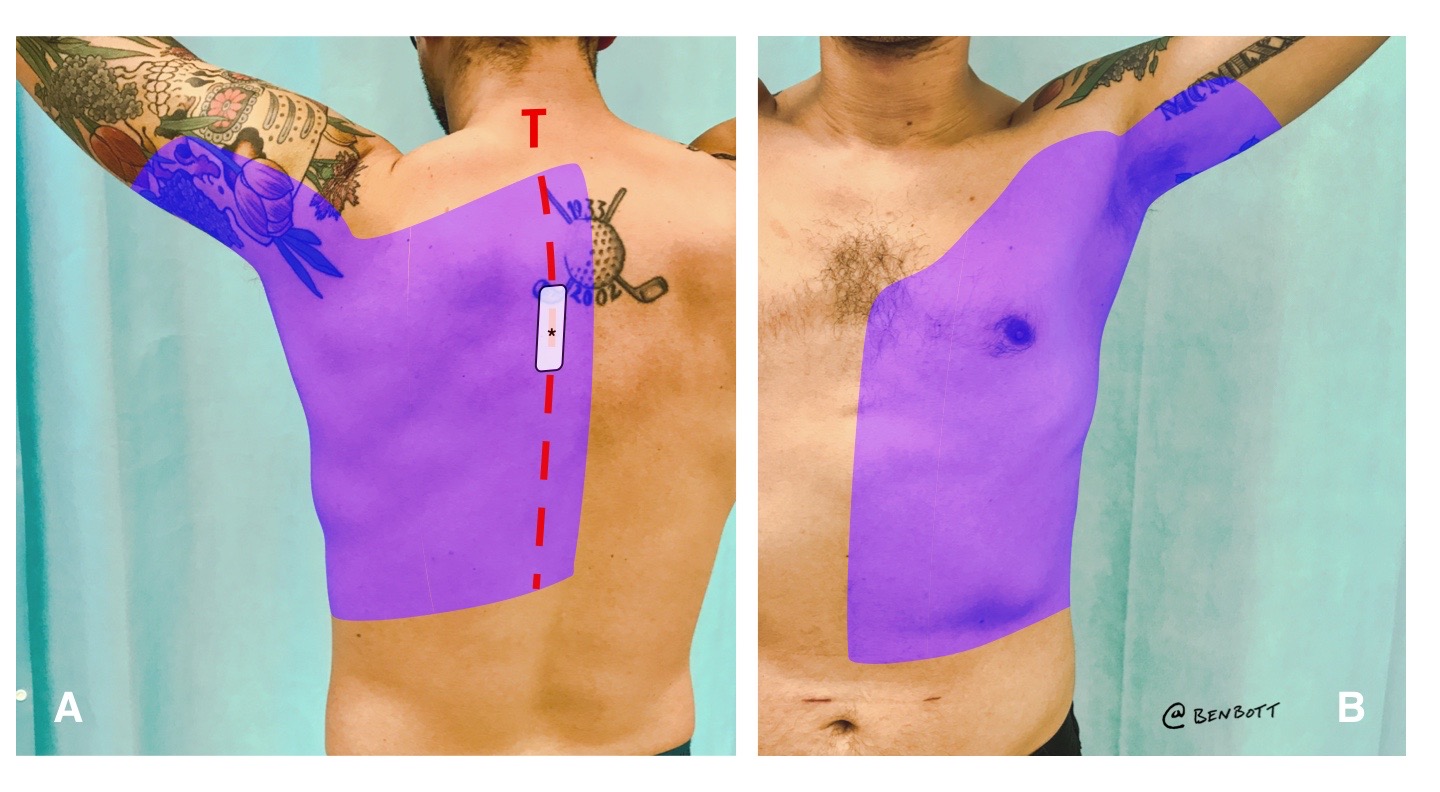
- extensive, reliable hemi-truncal analgesia - ~3 vertebral levels above and 4 levels below injection point (Fig 2)
- safety - needle path is in chest wall, outside thoracic cage, and away from pleura, spinal cord, and deep vessels. The needletip is visible throughout procedure. The broad transverse processes shield deeper structures.
- the TPs provide large targets for sonographic identification and needle guidance
- patient can be positioned prone, lateral ducubitus, or seated; depending on patient and operator preference
- rapid performance - needling time typically less than 5 minutes
Erector is GREAT for hemithorax/hemiabdominal anagesia:
- extensive chest wall trauma
- posterior rib fractures
- thoracic or abdomnial acute herpes zoster or post herpetic neuralgia
- vertebral compression fracture
- acute appendicitis! (after CT confirmation and surgery consult)
Erector is NOT great for:
- surgical-grade anesthesia of lateral or anterior thorax/abominal wall (i.e. using as sole anethetic for painful chest/abd wall procedures such as abscess drainage). It provides analgesia in this region, but unlikely surgical grade anesthesia.
Figure 2
How it's done:
Positioning
Expose the posterior thorax by placing the patient prone, in lateral decubitus, or leaning forward in a seated position. For the prone position, stand at the head of the bed with the ultrasound system on either side of the bed at the level of the patient's thighs. For the lateral decubitus position (with patient lying on their unaffected side), sit at the side of the bed facing the patient's back with the ultrasound system on the opposite side of the bed (anterior to the patient). For the seated position, seat the patient on the edge of the bed leaning forward onto a side table in a position similar to the seated lumbar puncture position. Stand behind the patient with the ultrasound system located on the opposite side of the bed anterior to the patient. For all positions, elevate the bed to a level where the needle, probe, and ultrasound screen can all be viewed in direct line-of-site with minimal head movement.
Identifying the optimal location for block placement
The substantial LA spread associated with this block allows for flexibility in block placement location. For rib fractures, target the TP that approximately coincides with the area the patient finds most painful. For acute herpes zoster, target the TP just above the rash so the needle does not pass through skin compromised by blisters.
Survey scan
Key bony structures (spinous process, TP, and rib) can be differentiated by their shapes and relative depths as the transducer is moved laterally from midline. At the targeted vertebral level, place a high-frequency linear transducer or lower frequency curvilinear probe in cephalocaudal orientation over the midline of the back to identify the vertebral spinous process. (Figure 3A, Figure 3B). Keeping the probe oriented cephalocaudal, slide the probe approximately 3cm laterally towards the side to be blocked, identifying the TP injection target (Figure 3C). To confirm TP identification, slide the probe beyond the target laterally, passing the probe over the costotransverse junction to the rib. The posterior rib adjacent to the costotransverse junction is both lateral and deep to the TP (Figure 3D). By sliding back and forth over the costotransverse junction, the differentiation between the TP and rib will be clear. The TP will be more superficial, blunter, and wider; the rib will be deeper, rounder, and thinner.
An alternative approach that we have been favoring since publication: start the survey scan far laterally on the posterior rib (near the posterior axillary line) then slowly scan medially until the TP appears. Scanning this direction (from far lateral towards the midline) allows for clear identification of rib while moving medially, making the abrupt appearance of the TP very distinct on the ultrasound image. "Scan Direction" arrow below shows this survery scan direction
Figure 3. Transducer positions and associated ultrasound images as the probe moves from medial to lateral.
A. Probe positions over the spinous process, TP and rib. Letters and associated dashed lines represent: S = Spinous processes, T = Transverse Processes, R = Ribs. Rounded rectangles = ultrasound transducer footprints (in this example centered on the 5th transverse process and adjacent spinous process and rib).
B. Ultrasound image corresponding to the left transducer footprint above, midline over the spinous process. The spinous process is identified as the very superficial hyperechoic structure in the midline of the back creating a hypoechoic acoustic shadow. SP = spinous process.
C. Ultrasound image corresponding to the middle transducer footprint above, over the transverse process. The TP is identified as the next most superficial bony vertebral structure (when compared to the spinous process) approximately 3 cm lateral from the spinous process. It resembles a rib, but has several distinguishing features. It appears more blunted, squared off, thicker and wider than the rounded, thin appearance of ribs. Additionally, the pleura deep to the TP is typically difficult to discern, as opposed to the pleura behind the ribs which is highly visible. Another distinguishing feature of the TP is that it abruptly disappears from view with continued lateral sliding of the probe. Ribs, in contrast, stay visible as the probe is moved laterally. Needle shown at target location for injection into the ESP. Trapezius = trapezius muscle. Rhomboid = rhomboid major muscle. Erector spinae = erector spinae muscle.
D. Ultrasound image corresponding to the right transducer footprint above, over the rib. The TP disappears from view as the probe passes laterally over the costotransverse junction, and with continued lateral probe movement, the rounded shadowing ribs and the pleura come into view and remain visible no matter how far the probe is moved laterally (unless obscured by the scapula)
Injection
With the transducer fixed over the targeted TP, identify a block needle insertion site aligned with the long axis of the ultrasound beam and approximately 1-2 cm away from the probe. (Figure 4A) The insertion site can be cephalad or caudad to the probe, as the TP can be approached from either direction. After sterile prep, place a LA skin wheal at the insertion site using a 25-27g needle. Then insert a block needle (for this block a standard 20g 3.5 in [90 mm] Quincke tip LP needle works well) through the skin wheal and advance the needle at a 30-45 degree angle towards the ultrasound beam. The transducer needs to be held firmly in a fixed position over the target and the operators focus should be on carefully aligning the needle with the transducer (focus on the hands) during the first 1-2 cm of insertion. After initial insertion of 1-2 cm stop further needle advance and make slight transducer and needle adjustments (keeping the TP in view) until the needle tip is visible on ultrasound (focus switchs to the ultrasound screen). Keeping the needle tip in view, continue advancing with in-plane ultrasound guidance to the posterior surface of the targeted TP. The operator will feel firm resistance upon contacting the TP (land gently -- the periosteum is sensitive). Once the needle tip is in the ESP below the erector spinae muscle, we recommend alternating aspiration (to confirm lack of inadvertent vascular puncture) with injection of small aliquots of LA or NS. Anechoic fluid should be seen separating the erector spinae muscle from the TP, confirming spread within the ESP. As with other plane blocks, using up to 10 mls of NS to gently hydrodissect open the ESP space and confirm location prior to switching to LA can be useful. Once satisfied with the needle position, gradually inject LA until a total of 30 mLs is deposited within the plane (Figure 4B). In our experience, total needling time is usually less than 5 minutes and trunk/abdominal anesthesia develops within 30 minutes
Figure 4 . Insertion site and ultrasound view of the ESPB.
A. Insertion site. The transducer is oriented cephalocaudal and held in position over the targeted TP. The needle insertion site is 1–2 cm from the probe, in-line with the ultrasound beam, and either cephalad or caudad to the probe, as the TP can be approached either direction.
B. Ultrasound-guided injection into the erector spinae fascial plane. The needle has gently contacted the posterior surface of the TP. Hypoechoic LA is seen lifting the ES muscle away from the TP and spreading across the posterior aspects of adjacent TPs, confirming spread within the ESP. If test injections are seen pooling in the erector spinae muscle instead, make slight adjustments of the needle tip (or rotate the needle so the bevel is facing the TP) until visualizing this planar spread within the ESP. Sc = subcutaneous tissue, Tr = trapezius muscle, Rh = rhomboid muscle, ES = erector spinae muscle, ESP = erector spinae plane, TP = transverse process, triangles = needle, asterisk = needle tip, arrows = LA in the ESP lifting the ES off the TPs.
For more resources and a higher resolution version of the above weight-based LA dose and volume guide for ESPB in the ED - click here -